
viernes, 27 de mayo de 2016
ACTIVIDAD 20.-LABORATORIO NACIONAL DE INTERNET DEL FÚTURO (LANIF)
En esta actividad, después de ver el vídeo presentado por la maestra, contestamos lo siguiente:


ACTIVIDAD 15: configuración de OSPFv3 básico de área única
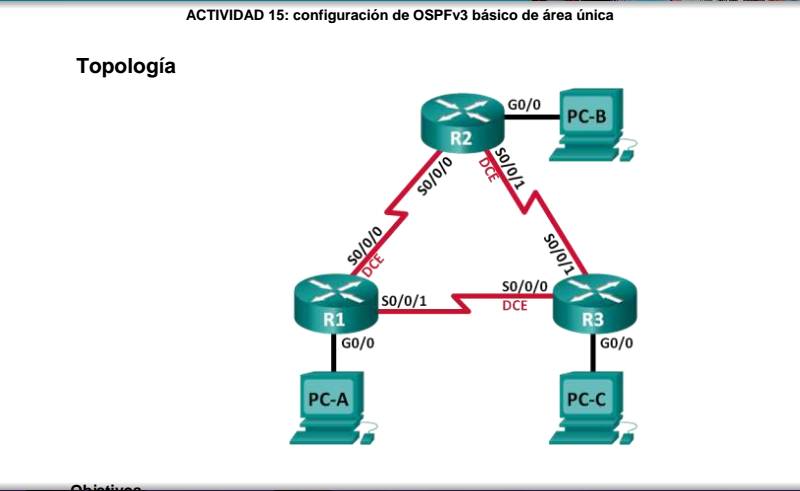
En esta actividad se realizó lo siguiente:
Parte 1: armar la red y configurar los parámetros básicos de los dispositivos
Parte 2: configurar y verificar el routing OSPFv3
Parte 3: configurar interfaces pasivas OSPFv3
Información básica/situación
El protocolo OSPF (Open Shortest Path First) es un protocolo de routing de estado de enlace para las redes
IP. Se definió OSPFv2 para redes IPv4, y OSPFv3 para redes IPv6.
En esta actividad, configurará la topología de la red con routing OSPFv3, asignará ID de router, configurará
interfaces pasivas y utilizará varios comandos de CLI para ver y verificar la información de routing OSPFv3.
Parte 2: configurar el routing OSPFv3
Paso 1: asignar ID a los routers.
OSPFv3 sigue utilizando una dirección de 32 bits para la ID del router. Debido a que no hay direcciones IPv4
configuradas en los routers, asigne manualmente la ID del router. Escriba los comandos utilizados en el R1.
Paso 2: configurar OSPFv6 en el R1.
Con IPv6, es común tener varias direcciones IPv6 configuradas en una interfaz. La instrucción network se
eliminó en OSPFv3. En cambio, el routing OSPFv3 se habilita en el nivel de la interfaz.
a. Emita el comando ipv6 ospf 1 area 0 para cada interfaz en el R1 que participará en el routing OSPFv3.
Parte 3: configurar las interfaces pasivas de OSPFv3
El comando passive-interface evita que se envíen actualizaciones de routing a través de la interfaz de
router especificada. Esto se hace comúnmente para reducir el tráfico en las redes LAN, ya que no necesitan
recibir comunicaciones de protocolo de routing dinámico. .
a. Emita el comando show ipv6 ospf interface g0/0 en el R1. Observe el temporizador que indica cuándo
se espera el siguiente paquete de saludo. Los paquetes de saludo se envían cada 10 segundos y se
utilizan entre los routers OSPF para verificar que sus vecinos estén activos.
b. Emita el comando passive-interface para cambiar la interfaz G0/0 en el R1 a pasiva.


ACTIVIDAD 13.- CONFIGURACIÓN BÁSICA DE RIPv2 Y RIPng


- Crear una ruta estática ip route 0.0.0.0 0.0.0.0 209.165.201.2
- El router anunciará una ruta a los otros routers si se agrega el comando router rip
- default.information originate
ACTIVIDAD 12.- Verifying IPV6 and IPV4


En esta actividad realizamos lo siguiente:
Part 1: Complete the Addressing Table Documentation
Step 1: Use ipconfig to verify IPv4 addressing.
a. Click PC1 and click the Desktop tab > Command Prompt.
b. Enter the ipconfig /all command to collect the IPv4 information. Fill in the Addressing Table with the IPv4 address, subnet mask, and default gateway.
c. Click PC2 and click the Desktop tab > Command Prompt.
d. Enter the ipconfig /all command to collect the IPv4 information. Fill in the Addressing Table with the IPv4 address, subnet mask, and default gateway.
Step 2: Use ipv6config to verify IPv6 addressing.
a. On PC1, enter the ipv6config /all command to collect the IPv6 information. Fill in the Addressing Table with the IPv6 address, subnet prefix, and default gateway.
b. On PC2, enter the ipv6config /all command to collect the IPv6 information. Fill in the Addressing Table with the IPv6 address, subnet prefix, and default gateway.
Part 3: Discover the Path by Tracing the Route
Step 1: Use tracert to discover the IPv4 path.
a. From PC1, trace the route to PC2.
PC> tracert 10.10.1.20
Step 2: Use tracert to discover the IPv6 path.
a. From PC1, trace the route to the IPv6 address for PC2.
PC> tracert 2001:DB8:1:4::A
Suscribirse a:
Entradas (Atom)